CONTENT-CREATION
Overview of My Content Creation Workflow
Creating regular content requires a workflow, in this blog post I share my workflow to churn out regular content.
Creating content online is one of the best ways to grow an audience and increase your prospects. It allows you to solidify your knowledge while helping others improve. It is a win-win and there are little reasons why you shouldn’t do it.
Are you interested in creating content online but not sure what to do, how to do it or where to begin? Then this blog post will hopefully help you out. In this post, I want to cover how I create content online and the workflow I use to create it.
Let’s get started.
Blog Posts
A big part of the content I create is my blog posts. I aim to produce 2/week, one on a Wednesday and one on a Saturday.
While my blog is for others to use, reference and learn from. It’s also an important place for me to document my knowledge and solutions so I can find them again in the future.
Anyway, let’s take a deeper look into how I create blog posts.
The Life of a Post
I’m a big fan of Notion for managing my posts. I often have several posts on the go at once with all of them at different stages of production. This is why it’s pivotal to have a central location where I can manage all the posts.
In my case, I use Kanban boards for blog posts. Below is a screenshot of my current Notion page so you can see how I organise my posts.
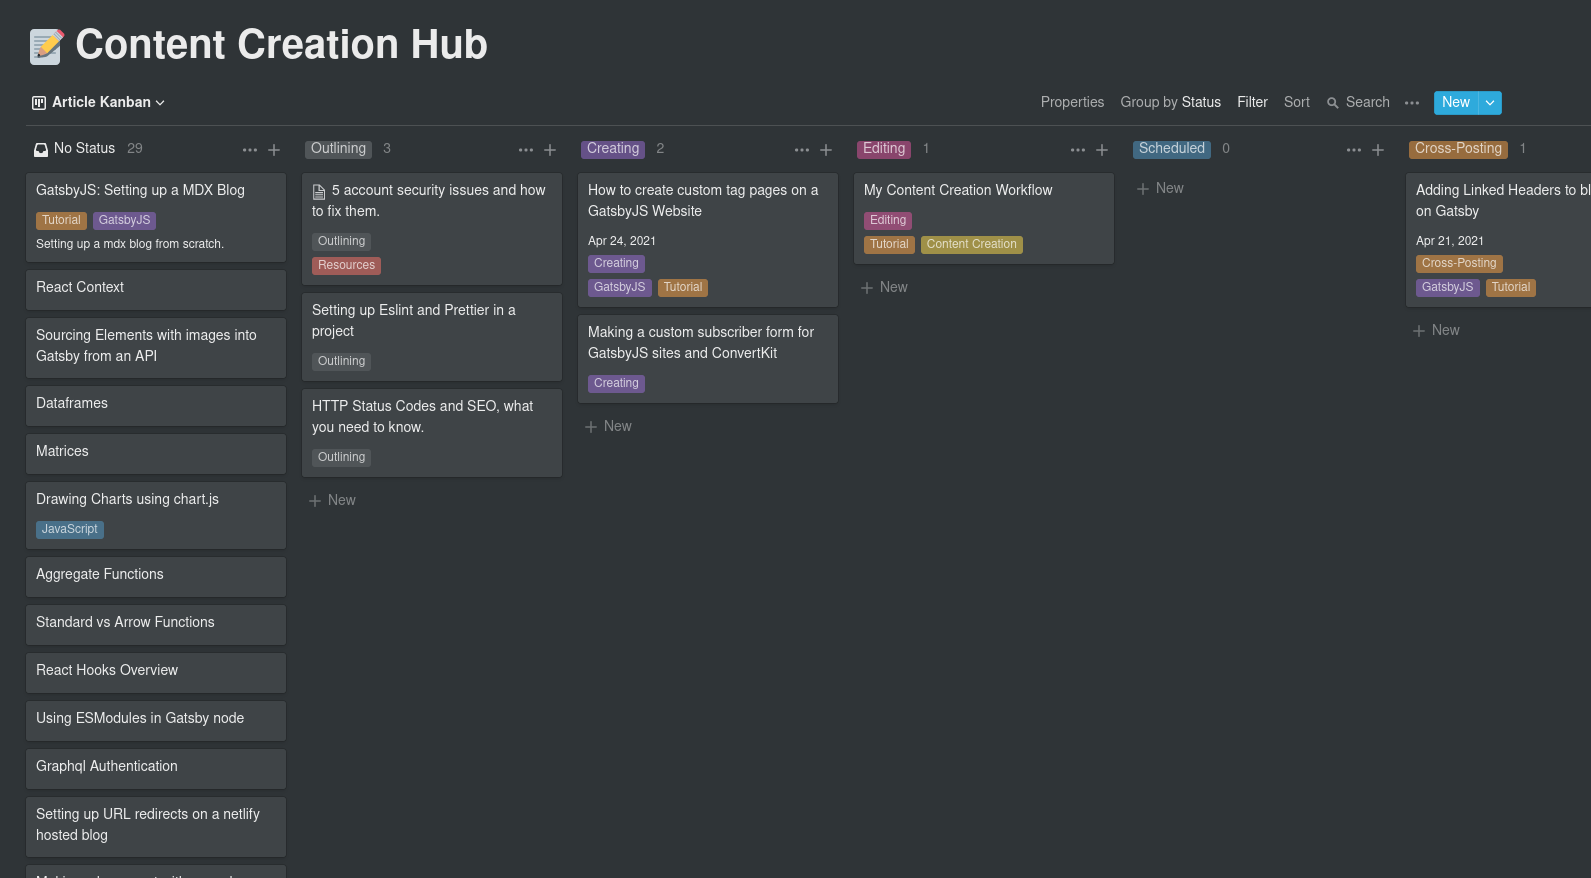
I have seven categories that I move posts between:
- No Status
- Outlining
- Creating
- Editing
- Scheduled
- Cross-Posting
- Published
When I get a new idea I create a new item in the ‘No Status’ category so I have a backlog of ideas to work from. Then as I work on them and they progress, they move to the right until it ends up in the ‘Published’ category.
Writing
Once I have laid out the structure of the post and have fleshed out the ideas it will cover, the post moves to the Outlining category.
Following this, it ends up in the first big section which is writing. This is where it will spend most of its time.
I try to write all my posts in one sitting, once I’m in the zone for writing I don’t want to leave it. Occasionally I will take a break and come back to a post, especially for longer posts but for smaller posts, I try to do it in one sitting.
The one thing I avoid at all costs is editing while writing. Some people will dwell on one sentence and keep re-writing it until it’s perfect. I avoid this as much as possible because it slows down the writing process and takes me out of the writing zone.
I write all my posts in MDX within VS Code. While it’s not a full writing editor like MS Word or Google Docs I actually think it’s beneficial. When you use a writing editor you’re reminded of spelling or grammatical errors as you write. In turn this draws your attention away from writing and towards editing which is what I want to avoid.
Once I’ve finished writing the post, I move to the editing phase.
Editing
There are two tools I use when I’m editing a post.
- Hemingway Editor
- Grammarly
You can use these individually on their respective web editors. But, what I prefer doing is using the Hemingway Editor and the Grammarly browser extension.
This allows me to get the benefits of both in one and not have to move back and forth between several places.
When it comes to doing the edits, I copy and paste the post over to the Hemingway Editor where I complete the bulk of my edits.
Once I’ve completed the edits and covered all the issues, I move the article back into MDX.
Finally, I give the article a read to ensure there aren’t any glaring issues.
I won’t claim to be a linguistics expert so my posts will likely have a degree of issues. But I do aim to fix all the issues that would stop people from understanding the concepts I’m discussing.
Finishing Touches
Once I’ve written a post and edited it, it’s on the home straight. The final things I do before publishing are:
- Create a cover image
- Populate the frontmatter
To create a cover image I use one of the templates that I’ve created in Figma. I like using templates that share a similar design because it creates a common theme to my posts.
I used to use a lot of stock images from places like Unsplash . But, I’ve since shifted mindset and want to use my cover images to create a common theme rather than a series of images that connect to the posts.
For the second point, all my posts share the same frontmatter information which is:
title:
date:
tags:
slug:
image:
published:
canonical_url:
description:
Before publishing a post I go through and populate all the relevant fields, this allows for custom SEO for each post.
Once this is all complete, I push the new post to GitHub with the
`published`
frontmatter set to either true or false. If I’ve pushed it before the publish date it will be false so it doesn’t show on the website.
Marketing
The final part of the journey for a blog post is marketing.
I cross-post all my posts to Medium, Hashnode and Dev.to but also share them on Twitter and LinkedIn. The goal of this is trying to get as many eyes in front of the post as possible and increase exposure.
I won’t go in-depth on cross-posting in this post but if you’re interested in reading more you can check out my post here.
For Twitter, I also reshare a post a couple of weeks after it was published to attract new people who haven’t seen it before.
Originally I wasn’t particularly fond of doing this but then I realised that there are no issues with self-promoting your work and trying to get new people to view your content. After all, it’s not guaranteed others will share it.
Twitter Content
Blog posts are only half of the story, I also create a lot of content on Twitter. I normally create 35 scheduled tweets/threads per week.
This may seem a lot but the truth is you have to feed the algorithm. But, a key piece of info to note is that there is a difference between spamming out 100’s of tweets per week and creating quality content for people to action.
If you create quality content for people to action, on a regular schedule, and commit to it for a long people of time then you stand a good chance of seeing positive trends.
Tools and Aids
If I’m asked what tool changed my Twitter game the most, the reply I give is the same every time, FeedHive.
FeedHive is a tweet scheduling tool that changed how I use and create content for Twitter. I won’t go in-depth on FeedHive in this post but if you’re interested in improving your Twitter Content Creation abilities, this is the tool to use.
Following this, the other tools I use for creating content is Figma for images and graphics and Carbon for code-snippets.
I also occasionally use the Twitter Analytics site so I can see how my tweets are performing and if I’m up or down on the previous month.
If I was to give one tip to someone starting to create content on Twitter it would be to trust in the data. If your tweet performance is trending upwards keep doing what you’re doing, if it’s trending down then it might be time to switch gears.
If you’re changing something, change a single aspect, give it a few weeks and see if the trends have changed. Repeat this process and you should stumble upon a formula that works for you.
Timelines & What to Share?
I mention that I post around 35 different tweets/threads per week, What are these? When do I tweet? And how do I fill them? Let’s answer these questions.
Below is a screenshot of my current schedule on FeedHive, it shows all the slots that I have to fill in a week:

Throughout the week if I come up with a new idea or something that I think would be good to share I create a new draft tweet in FeedHive.
Then on either a Saturday or Sunday, I’ll sit down and work through all the slots I need to fill. To fill them, I’ll use the drafts I’ve created during the week and any new ideas that come to me when as I’m filling the slots.
When you first start, it does feel like a lot of time is committed to content creation but the longer you do it, the easier it becomes.
Reposting
There are a few reasons for this but one of the big ones is that you’ve built up a backlog of content. There’s no shame in reposting an old piece of content you’ve made as long as you’re not reposting something that you’ve just sent out.
In fact, reposting is a good thing because it means you can create your weekly content faster and it gives new followers an opportunity to see content they may have not seen before.
However, It’s important to find a good balance between reposting old content and creating new content. I aim for 75% of my weekly content to be brand new, some weeks it may be more and some it will be less. As a rule of thumb as long as you’re putting out more new content than recycled content you should be okay. Personally, I try to verge on the side of caution and do the bulk of my content as new.
Topics
When it comes to what I tweet about, here are the categories:
- Filler: Quotes, advice or other thoughts I think might help people
- Marketing: Sharing previous blog posts
- Blog: Posting out my latest blog post
- Build In Public: Updates on projects I’m working on
- Tips / Tricks: A tip or trick I’ve recently found or used
- Resources: A thread of resources I find helpful or people can use
I spread these throughout the week and try to vary them as much as possible so people don’t get inundated with the same content. As a rule of thumb, I tend to do a filler and marketing tweet every day and then fill the gaps with the other categories. This allows me to put out a variety of content throughout the week.
Summing Up
Overall, creating content for my blog and Twitter has been great a journey and I look forward to continuing it. It has allowed me to help others grow while also helping me develop my knowledge and understanding in areas I otherwise wouldn’t have.
If you’re interested in getting started creating content online hopefully this post has been of some help to you. If you have any questions you’d like to ask me please feel free to reach out to me over on Twitter.
If you found this post helpful, please consider sharing it so others can find it helpful too. And, if you’d like to see more content like this please consider following me on Twitter.